Story
Act 1: The Sallow Road
(Idea) The protagonist walks on alone with the two letters, reaches Halfway, the market town under truce where the roads to Twinhold and Lanternfall meet, and is found there by Tamsin Vale and Rook, both looking for whoever rang the Glass. News comes that something has risen out of the Sallow at the Drowned Steps; the protagonist goes back and drives off the Sallow Wyrm with Repel and Coil while whichever recruiters came watch from the bank. The act ends at Halfway's two gates, choosing which letter to deliver first.
Beats from the Story Bible and where they land:
| Story Bible beat | Scene |
|---|---|
| The player walks on alone from the Drowned Steps, carrying the two letters | 1.1, 2.1–2.3 |
| Halfway, the neutral market town; both sides trade under truce | 3.1–3.5 and section 4 |
| Introduces the Market (main tab, section 9) | 3.3 |
| Introduces the Proving Ring, the PvP arena (main tab, section 10) | 3.4, 4.5 |
| Tamsin Vale and Rook arrive looking for "whoever rang the Glass" | 4.1–4.4 |
| The Sallow Wyrm rises at the Drowned Steps once Aske has gone; Repel staggers it, Coil hurts it | 5.1–5.4 |
| Coil, learned at the end of the Prologue, put to work | 2.2, 5.3 |
| The road onward to the Act 2 choice (which letter first) | 6.1–6.4 |
act1.stage drives the act, as prologue.stage drives the Prologue:
| Stage | Means | Set by |
|---|---|---|
| 0 | The Prologue is done; Act 1 has started. | (unset) |
| 1 | The protagonist has left the Steps alone. | Act1_Steps_Alone |
| 2 | Arrived at Halfway. | Act1_Halfway_TruceStone |
| 3 | Slept at the Split Loaf; the strangers are in town. | Act1_Halfway_Morning |
| 4 | Met both Tamsin and Rook together. | Act1_SplitLoaf_Table |
| 5 | The Ring bout is over and the Wyrm news has come. | Act1_Ring_News |
| 6 | The Sallow Wyrm is driven off. | Act1_Wyrm_Rise (on a win) |
| 7 | Reported to the Reeve at Halfway. | Act1_Halfway_Reeve_After |
| 8 | Chose a road; Act 2 begins. | Act1_Gates_Choose (which also sets act1.done 1) |
Chapter 1: Alone
Scene 1.1: Mind the current
- Where:
drowned_steps, a walk-in triggerEvent_steps_alonebetween the fragment andExit_to_overworld, radius 3. - When:
all[prologue.stage >= 7, act1.stage == 0], noonce(the stage decides). - Who: the protagonist, alone. Something under the water.
- What happens: For the first time since the river started climbing, it is calm, and in the quiet there is a hum on the water, low and many-voiced: Tobin's drowned choir, or something like it. Past the lowest step a long pale shape turns under the surface, as long as a barge, and is gone. The protagonist is alone with two letters and a road.
- Player does: walk into the trigger; choose a reaction ("Tobin was right." / "Something's down there." / say nothing and go). The choice changes one line.
- Content to make:
Act1_Steps_Alone(Dialogue/Act1/steps.yarn). Setsact1.stage1 andheard.choir1. Questsallow_roadstarts (itsstartWhenis the Prologue's end). - Art and audio: an under-water shadow of the Wyrm sliding past the steps (a moving decal or a dark mesh under the water plane, no model needed); a choir-hum ambience stem for the Steps, reused whenever the Steps are calm.
- Screens used: Dialogue box, Choices, Quest log (new quest).
Chapter 2: The Sallow Road
The overworld scene grows: past the Drowned Steps' turning the road goes on to Halfway's bridge. New markers Road_1 to Road_3 and an exit Exit_to_halfway with a matching Spawn_from_halfway.
Scene 2.1: The milestone
- Where:
overworld, triggerRoad_1beside a milestone, radius 4, once. - When:
act1.stage >= 1. - Who: the protagonist.
- What happens: A milestone at a fork in the towpath reads HALFWAY twice: once in neat Evane letters cut mirror to mirror, once scratched below in a Facet hand with someone's sigil. Narration explains the name: Halfway sits halfway between Twinhold and Lanternfall, and both cities say they walked further to reach it.
- Player does: walk; read.
- Content to make:
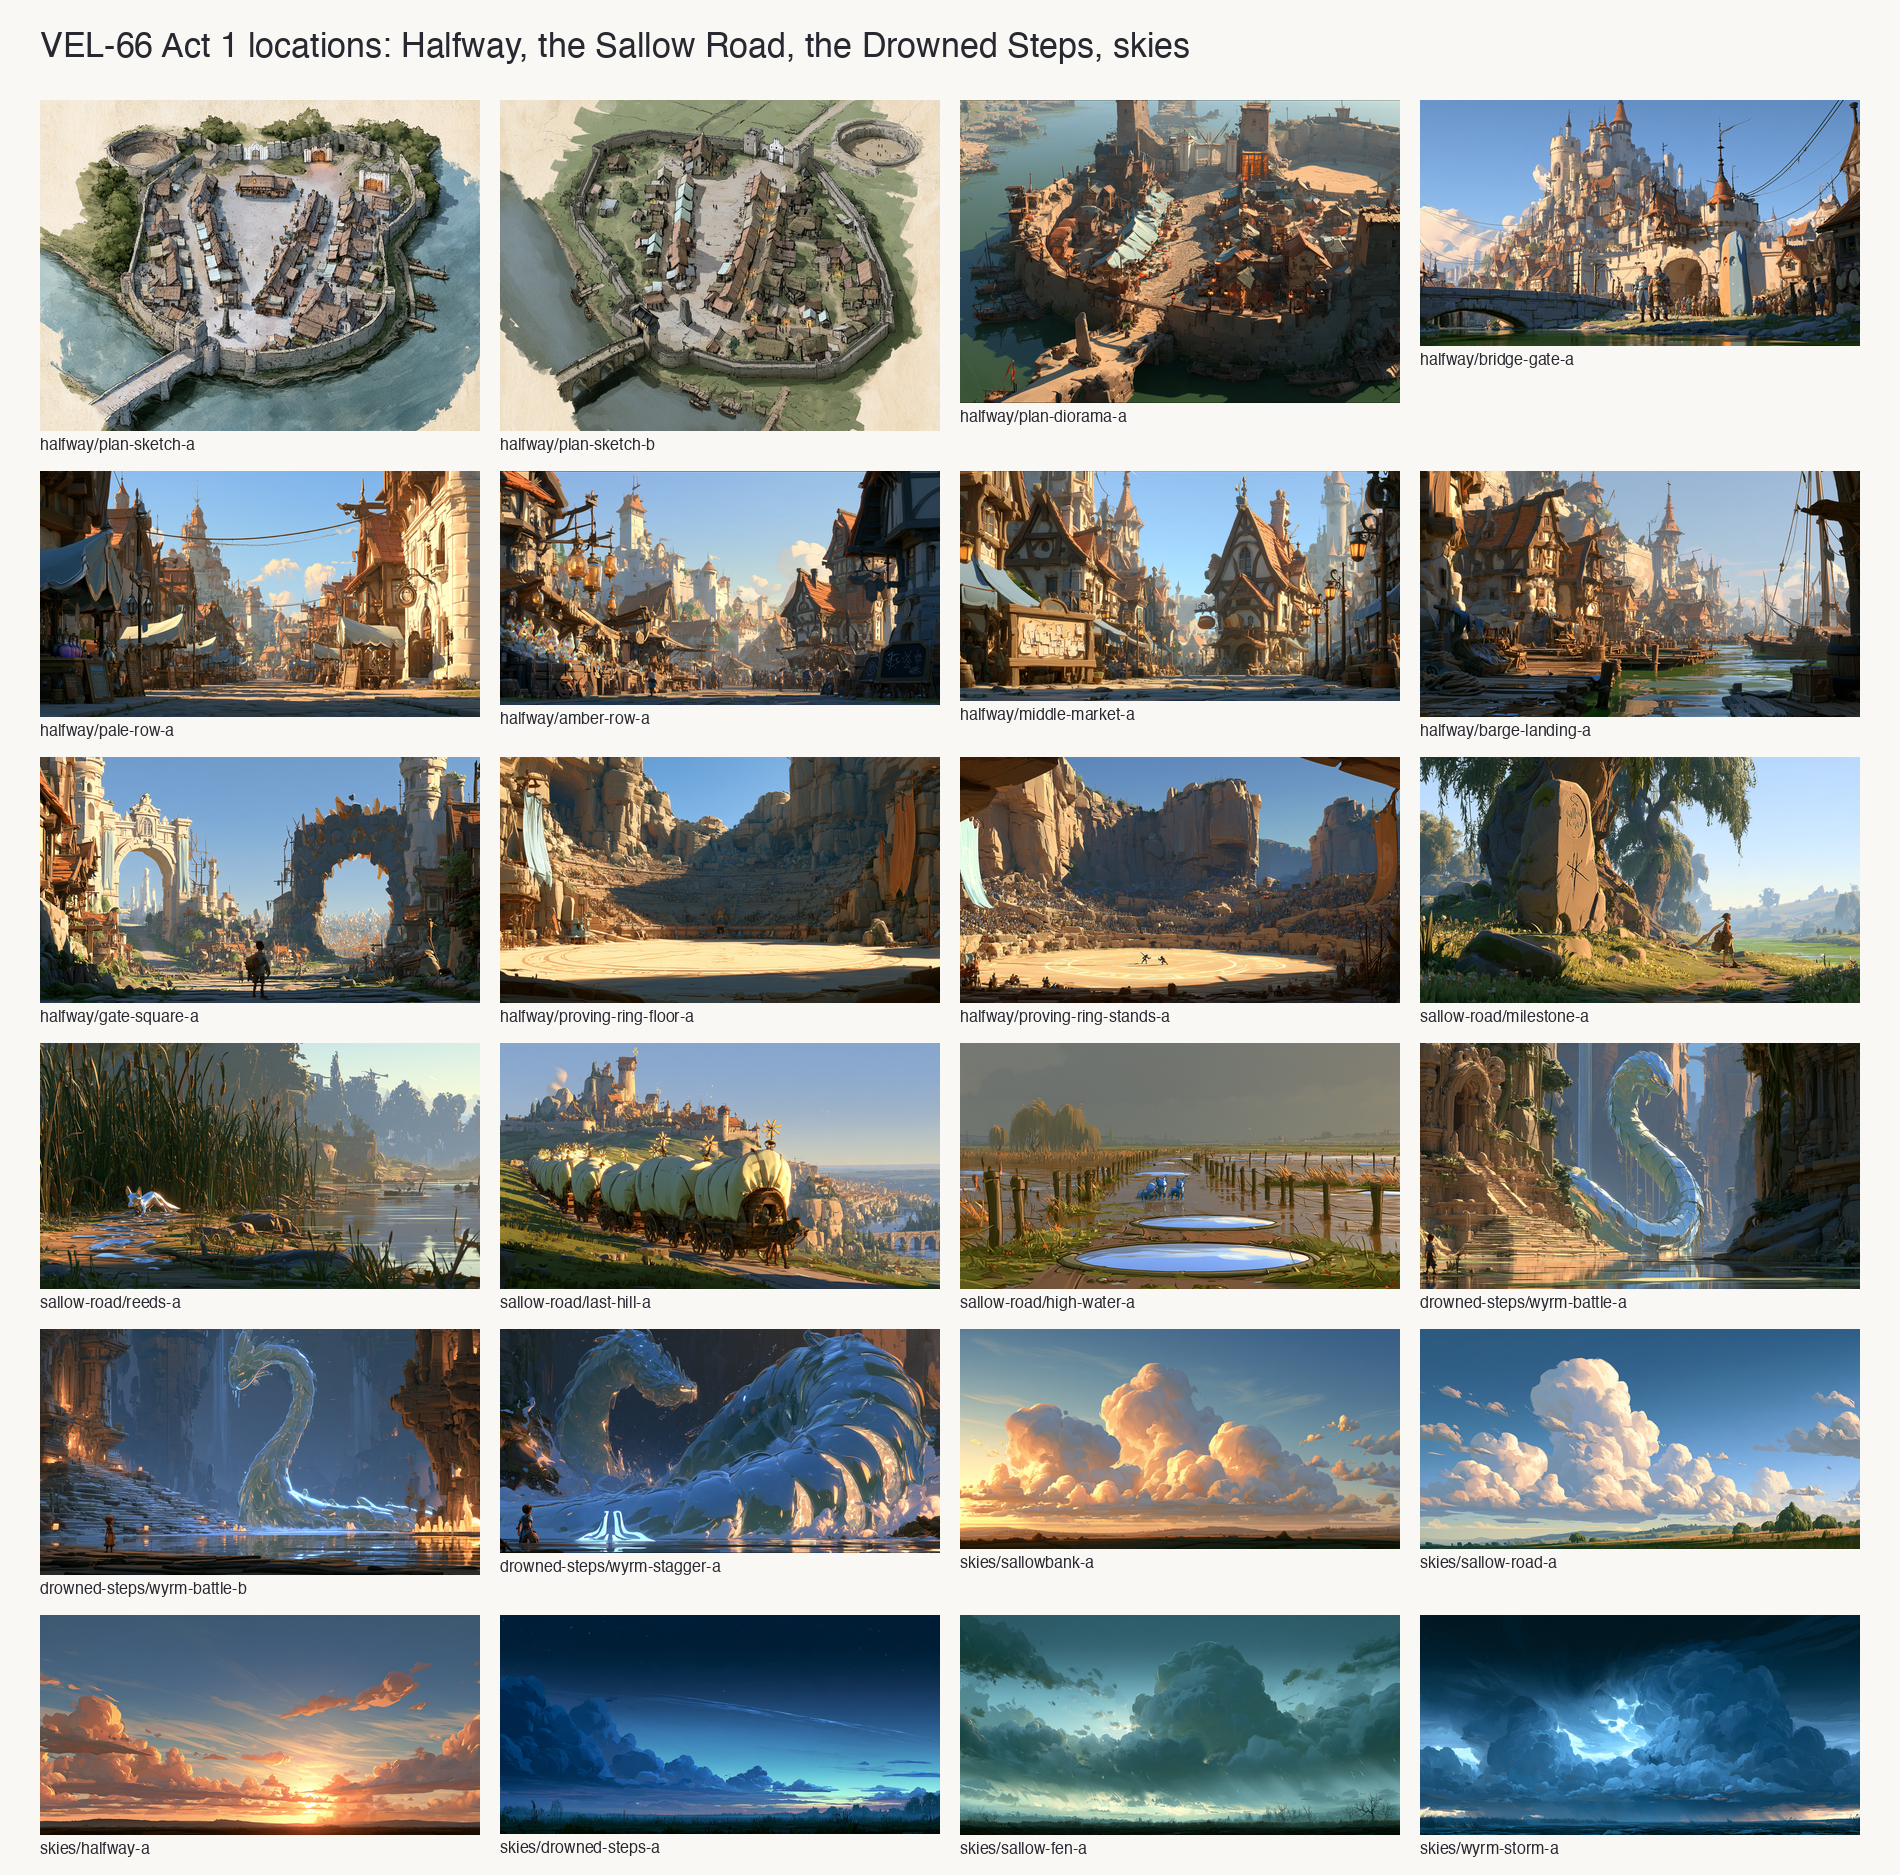
Act1_Road_Milestone(Dialogue/Act1/road.yarn). No flags. - Art and audio: a milestone prop with both inscriptions (fits the river-road kit, concepts
river-road-kit-a/b). - Screens used: Dialogue box.
Scene 2.2: Glints in the reeds
- Where:
overworld, triggerRoad_2in a reed bed by the towpath, radius 5, once. - When:
act1.stage >= 1. - Who: the protagonist, three glints.
- What happens: The first fight without Aske. Three glints slip out of the reeds onto the road, hungry, their spoon-bowl mirror faces all turned the same way. Without the door behind them the protagonist has only their hands: Repel to throw them off, Coil to finish them. Afterwards they melt into puddles of quicksilver that run back to the river.
- Player does: fight: the first battle where Coil matters. Flee is allowed.
- Content to make:
Act1_Road_Glint(starts the battle; a win line and a flee line). Encounterroad_glint(3glint). Setsfought.glint1. - Art and audio: the glint model (concepts
glint-ref-newt-a/b,glint-poses-a,glint-defeat-a); a riverbank battle backdrop (the arena with reeds, orarena-drowned-steps-areused); glint hit and melt sounds. - Screens used: Dialogue box, Battle HUD, Battle result.
Scene 2.3: Wagons with green sails
- Where:
overworld, triggerRoad_3where the road leaves the river for the last hill before Halfway, radius 6, once. - When:
act1.stage >= 1. - Who: Jory, a Waymaker drover, and his wagons (passing).
- What happens: A short train of wagons rolls by under pale-green-lit sails, windmill toys spinning on the roofs. Jory the drover slows to say Halfway is full of pale blue and amber this week: everyone felt something ring, and everyone's come to see who did it. He offers a lift as far as the gate and won't take a copper: "Waymakers carry. That's the whole of it."
- Player does: talk; accept the lift (a fade cuts to the Halfway exit) or walk on.
- Content to make:
Act1_Road_Jory. A cut toExit_to_halfwayon accepting (<<fade_out>>, place the player,<<fade_in>>). Setsmet.jory1. Seeds Caravan-master Dace and the Long Road for Act 2. - Art and audio: a Waymaker wagon with a pale-green sail (concepts
long-road-kit-a/b); Jory (conceptwaymaker-driver-concept). - Screens used: Dialogue box, Choices.
Chapter 3: Halfway
The town itself is described in section 4.
Scene 3.1: The Truce Stone
- Where:
halfway, arriving atSpawn_from_overworldby the bridge gate; the scene plays at the Truce Stone just inside. - When:
act1.stage == 1, as a locationenterentry. - Who: the Gate Pair (Sef, a Warden, and Wren, a Facet), then Reeve Hollin Tace.
- What happens: Sef and Wren check everyone who comes in, each their own way: Sef looks at the visitor's hands, Wren at their sigil, and they finish each other's sentences while pretending not to. They set out the truce: everyone trades, nobody casts inside the walls except in the Proving Ring, nobody recruits by force. Wren asks the protagonist's sigil; they have none, which Wren finds sad and Sef finds proper. The Reeve, passing, welcomes them: "Everybody's welcome. Nobody's welcome to cast." Rooms are at the Split Loaf.
- Player does: talk; choose how to introduce themselves (a farmer from Sallowbank, a traveller, or nothing).
- Content to make:
Act1_Halfway_TruceStone(Dialogue/Act1/halfway.yarn). Setsact1.stage2,met.reeve1. Afterwards the Reeve's "Talk" playsAct1_Halfway_Reeve, which picks lines by stage. Truce rule in data: Halfway has no field-cast interactables outside the Ring. - Art and audio: the Truce Stone (a standing stone with a mirrored glyph on one face and a Facet sigil on the other), the bridge gate; the Halfway music (section 4). Gate Pair concepts:
warden-guard-concept,facet-guard-concept. - Screens used: Dialogue box, Choices, Quest log.
Scene 3.2: The Rows
- Where:
halfway, the Pale Row and the Amber Row (section 4). - When:
act1.stage >= 2. Free roam. - Who: Sister Orla (Tender healer), Harl (Evane silversmith), the Measure Post clerk, Quill (Facet glass-cutter), Nell (Facet glyph-giver).
- What happens: The two rows face each other across the Middle Market. The Pale Row is pale blue awnings, symmetrical stalls and very polite prices; the Amber Row is mismatched glass, amber lamps and haggling. Nell sits at a table giving away chalk copies of Facet glyphs to anyone who asks, and the protagonist learns that a copy fizzles until it's traced from a real fragment ("The glyph's free. The tracing's up to you."). Sister Orla is treating bargefolk for cuts from "something in the river", the first rumour of the Wyrm.
- Player does: walk, talk, browse the shops, start the Mend side quest (scene 3.5).
- Content to make:
Act1_Halfway_Orla,_Harl,_MeasurePost,_Quill,_Nell, each with a before-the-Wyrm and after-the-Wyrm part, as the villagers have per stage. Taking a chalk copy from Nell setstook.chalk_copy1 (rep.facets+5). Shops: section 4. - Art and audio: stall kit in two versions (pale blue awnings, amber glass); NPC placeholders until models (concepts
tender-adept-conceptfor Orla,facet-merchant-conceptfor Quill). Concepts:halfway-a/b,halfway-market-a/b,halfway-kit-a/b. - Screens used: Tap prompt ("Talk", "Browse"), Dialogue box, Choices, Shop (Idea).
Scene 3.3: The Middle Market
- Where:
halfway, the Middle Market square: Hob's Sundries, the Market board, the Truce Board and the token-changer. - When:
act1.stage >= 2. - Who: Hob (sundries and the Market board), Bram Tolley (innkeeper, at the Split Loaf door).
- What happens: Hob runs the general store and keeps the Market board, where traders post goods for sale and buyers take them: the Market (main tab, section 9), where trading happens through the board and never hand to hand. Today it holds traders' listings; Hob says it fills up with travellers' goods "when the roads are busy". Next to it, the Truce Board carries jobs anyone can take (side quests, section 11). Hob sells boots that don't leak, which Aske asked for.
- Player does: browse; read both boards; buy.
- Content to make:
Act1_Halfway_Hob,Act1_Halfway_Board. Setsseen.market1. Items: section 4. - Art and audio: the Market board and Truce Board props (notice boards, one with pale blue and amber pins); market crowd ambience.
- Screens used: Tap prompt ("Browse", "Read"), Shop, Market board (Idea), Truce Board (Idea), Satchel (Idea).
Scene 3.4: The Proving Ring
- Where:
halfway, the Quarry at the end of Quarry Lane; Ringmaster Ulla Stroud atMark_ulla. - When:
act1.stage >= 2. Optional now; required in scene 4.5. - Who: Ringmaster Ulla Stroud; a practice bout on the sand.
- What happens: The old quarry is a round sand floor under tiered stone seats, pale blue banners on one side and amber on the other. Ulla explains the Ring: the one place in Halfway where casting is allowed, under ring wards painted beneath the sand that make every spell pull its punches, like the glyph on Aske's golem. People come from both sides to prove their hands against each other here, and only here. She looks at the protagonist's thumbs and tells them to come back with someone worth fighting.
- Player does: talk; watch a practice bout between two strangers (a short cutscene).
- Content to make:
Act1_Ring_Ulla. Setsseen.ring1. The Ring is where PvP lives later (main tab, section 10); in Act 1 it hosts story bouts only (question 3 in section 13). - Art and audio: the Proving Ring as a location and as a battle arena (concepts
proving-ring-a/b,arena-proving-ring-a); a crowd loop; ring-ward glyphs glowing under the sand during a bout. - Screens used: Tap prompt ("Talk"), Dialogue box.
Scene 3.5: Sister Orla's errand (Mend)
- Where:
halfway, Sister Orla's stall on the Pale Row, then the Barge Landing. - When:
act1.stage >= 2; any time before the end of the act. Optional, but the quest log suggests it before the Wyrm. - Who: Sister Orla, Dorrit Mallow (bargewoman).
- What happens: Orla needs tonics carried to Dorrit's crew at the Barge Landing, who were cut by something under the river. Dorrit is blunt about it: something has been rocking barges near the Drowned Steps for two nights. Back at the stall, Orla teaches Mend hand over hand, a taught glyph with no fragment, because the protagonist has "two good hands and a long road". She is a Tender: she heals what would heal anyway, and says so.
- Player does: talk, carry, learn Mend by tracing.
- Content to make: quest
mend_lesson; nodesAct1_Orla_Errand,Act1_Landing_Dorrit_Tonics,Act1_Orla_Lesson(ends in<<learn_spell mend>>). Orla gives 3mend_tonicto carry (<<give_item mend_tonic 3>>) and Dorrit takes them (<<take_item mend_tonic 3>>). Setsorla.stage1–3,spell.learned.mend1,rep.evane+5. - Art and audio: the Barge Landing and a moored barge; Mend Tonics (concept
items/healing-tonic-ref-a); Mend VFX (doesn't exist yet: a violet cup of light). - Screens used: Dialogue box, Choices, Trace lesson, Quest log.
Chapter 4: Whoever rang the Glass
Scene 4.1: The morning after
- Where:
halfway, the Split Loaf (interactable "Rest" at Bram Tolley), then the Truce Stone. - When:
act1.stage == 2. Resting is open as soon as the player arrives; the quest log nudges them to look round first. - Who: Bram Tolley; a crowd at the Truce Stone; Tamsin and Rook glimpsed.
- What happens: Bram gives the protagonist the last room ("The town's full of people looking for someone."). In the morning the Truce Stone has a crowd: a Warden in silver and pale blue is asking stall-keepers about whoever rang the Glass three nights ago, and a one-armed Facet on a crate is asking the same thing louder. Neither knows yet who they're looking for.
- Player does: rest; walk out into the morning.
- Content to make:
Act1_SplitLoaf_Rest,Act1_Halfway_Morning(plays on waking, with<<fade_out>>/<<fade_in>>). Setsact1.stage3. Actors: Tamsin atMark_tamsin_pale_rowand Rook atMark_rook_amber_row,when act1.stage == 3. - Art and audio: the Split Loaf interior (an inn whose sign is a loaf split down the middle); morning variant of the Halfway lighting if cheap, otherwise a fade.
- Screens used: Tap prompt ("Rest"), Dialogue box.
Scene 4.2: Tamsin Vale
- Where:
halfway, the Pale Row,Mark_tamsin_pale_row. - When:
act1.stage == 3,unless: met.tamsin. - Who: Tamsin Vale.
- What happens: Tamsin is questioning the Measure Post clerk with a list. She is earnest, quick, and quotes rules the way other people quote proverbs. She guesses it's the protagonist when she sees the pale blue seal on Aske's letter, then asks to see their hands: she draws a small mirrored mark in the air with one finger of each hand (not a cast; she keeps the truce) and asks them to copy it. Their copy is so even that she goes quiet for a moment.
- Player does: talk; admit to ringing the Glass or deny it (she knows either way); copy her mark. Until there is a gesture for an uncast drawing, the copy is told in narration.
- Content to make:
Act1_Halfway_Tamsin(her entry node; it picks a part by stage, as the villagers' do) and its_Meetpart. Setsmet.tamsin1;tamsin.trust+1 for honesty;hid.glass1 if they deny it. Ifmet.rookis already set, jumps to scene 4.4. - Art and audio: Tamsin's model (concepts
tamsin-concept-a/b,tamsin-ref-a,tamsin-expressions-a); her glyph bands glow faintly when she draws. - Screens used: Tap prompt ("Talk"), Dialogue box, Choices.
Scene 4.3: Rook
- Where:
halfway, the Amber Row,Mark_rook_amber_row. - When:
act1.stage == 3,unless: met.rook. - Who: Rook.
- What happens: Rook is on a crate juggling a glass shard with his one hand, telling a crowd that whoever rang the Glass should be handed every glyph there is. He spots the protagonist's thumbs before anything else: calluses on both, in the same place ("Farmers get them on one."). He sees the amber seal and laughs at the name on it. He calls the Evane "the Wardens' lot" and his own people "Facets"; the protagonist can answer with either word for them.
- Player does: talk; choose "Facets" or "Shattered" (Rook notices); admit or deny.
- Content to make:
Act1_Halfway_Rook(entry node, by stage) and its_Meetpart. Setsmet.rook1;rook.trust+1 for honesty;hid.glass1 if they deny it;name.facets1 if they say "Facets", 2 if "Shattered" (Story Bible section 2: the name is a choice NPCs notice). Ifmet.tamsinis already set, jumps to scene 4.4. - Art and audio: Rook's model (concepts
rook-concept-v3-a/b,rook-ref-v3-a,rook-expressions-a): one arm, cloak over the empty left side; an amber shard prop for the juggling idle. - Screens used: Tap prompt ("Talk"), Dialogue box, Choices.
Scene 4.4: The table at the Split Loaf
- Where:
halfway, the Split Loaf, a corner table (Mark_table_tamsin,Mark_table_rook,Cam_split_loaf). - When: plays straight after whichever of 4.2 and 4.3 comes second:
all[met.tamsin != 0, met.rook != 0, act1.stage == 3]. - Who: Tamsin, Rook, Bram Tolley.
- What happens: They have plainly met before: Tamsin's company once chased Rook out of a Warden town, and neither will say which. Under the truce they sit at one table and make their cases. Tamsin: Twinhold can teach the protagonist properly, under rules that keep people safe. Rook: Lanternfall will give them everything and let them choose. Each sees the other's seal on Aske's letters, and each recognises the name on their own city's letter (Ondine Ash and Iver Kest, as Act 2 has them; question 5). They agree on one thing: in Halfway the only place to see the protagonist cast is the Ring.
- Player does: talk; choose who to answer first (sets which guide warms faster); agree to the Ring.
- Content to make:
Act1_SplitLoaf_Table. Setsact1.stage4;tamsin.trustorrook.trust+1 depending on who was answered first. - Art and audio: inn table and benches; a tighter camera; the Halfway music drops to the inn ambience.
- Screens used: Dialogue box, Choices.
Scene 4.5: A bout in the Ring
- Where:
halfway, the Proving Ring (Tamsin atMark_tamsin_ring, Rook atMark_rook_ring); the battle uses the Proving Ring arena. - When:
act1.stage == 4; Ulla's "Talk" offers the bout. - Who: Tamsin (opponent), Rook (in the seats, betting on the protagonist), Ringmaster Ulla, a crowd.
- What happens: Tamsin asks for a bout under the wards: a Warden's measure of the protagonist's hands. Rook puts a Facet token on the farmer. Tamsin fights clean, all Warden corners. Win or lose, the crowd saw something: afterwards Rook steps onto the sand and, to show it can be done, draws a Facet Seal one half at a time with his one hand, holding the circle open in the Glass while he draws the square. Tamsin calls it impossible and watches anyway.
- Player does: fight. Losing is allowed (the wards stop the bout); it changes only lines and who collects the bet.
- Content to make:
Act1_Ring_Bout(starts the battle, then the after lines),Act1_Ring_RookSeal(cutscene). Encounterring_tamsin. Setsring.tamsin.won1 on a win;rook.trust+1 on a win (he won his bet),tamsin.trust+1 either way if the player fought clean. Stays at stage 4; scene 5.1 follows straight on. - Art and audio: Proving Ring arena with crowd; Tamsin battle model and casting animations (her Repel and Brace in Warden pale blue); Rook's one-handed Facet Seal VFX: a circle held open, then a square, fusing (Facet Seal VFX exists in
Assets/Art/VFX/FacetSeal, split in two). - Screens used: Dialogue box, Battle HUD, Battle result.
Chapter 5: The Sallow Wyrm
Scene 5.1: News from the landing
- Where:
halfway, the Proving Ring, straight after 4.5. - When:
act1.stage == 4, after the bout. - Who: Dorrit Mallow, Tamsin, Rook, Ulla.
- What happens: Dorrit runs in soaked: "The river stood up at the Drowned Steps. Stood up!" Something made of the river's own reflection took her barge under and is coiled round the Steps, and the water is climbing again. Sallowbank is a morning's walk from the Steps. Tamsin says the Wardens should be sent for; Rook says it's a glint and glints break. Both say they're coming. The protagonist, who rang the Glass three nights ago, wonders aloud whether the ringing woke it (Tamsin: "Things in the Glass hear when it rings.").
- Player does: talk; choose who comes: both, Tamsin only, Rook only, or neither.
- Content to make:
Act1_Ring_News. Setsact1.stage5;companion.tamsinandcompanion.rook(1 if coming). Quest stageback_to_steps. - Art and audio: Dorrit placeholder, wet; an alarm bell from the landing.
- Screens used: Dialogue box, Choices, Quest log.
Scene 5.2: The road back
- Where:
overworld, fromSpawn_from_halfwayback toward the Drowned Steps; triggerRoad_4near the Steps' turning, radius 6, once. - When:
act1.stage == 5. - Who: the protagonist, and whichever companions came (in dialogue; they don't follow on the map until a companion system exists).
- What happens: The towpath is half under water and the river is the wrong colour, bright as a mirror in patches. At the turning, glints are on the road, scattered by whatever is at the Steps. Tamsin and Rook, if both came, argue about the warp: Tamsin repeats the Wardens' line that the Facets did it; Rook says a Warden mending tore it open. Neither knows the whole story.
- Player does: walk; fight a glint pack (optional if they go round the reeds); talk.
- Content to make:
Act1_Road_Back(lines vary by companion flags). Encounterroad_glintreused on a second markerRoad_5,when act1.stage == 5, once. Overworld water level raised and a mirror-patch shader on the river whileact1.stage == 5(a locationwhenon a scene object, or a material swap: question 9). - Art and audio: high-water variant of the towpath; mirror patches on the river; a tense variant of the overworld loop.
- Screens used: Dialogue box, Battle HUD, Battle result, Exit sign.
Scene 5.3: The Wyrm rises
- Where:
drowned_steps, a walk-in triggerEvent_wyrmat the top of the stairs, radius 4; the battle uses a Drowned Steps arena. - When:
act1.stage == 5, noonce: a loss leaves the stage at 5 and the trigger fires again. - Who: the Sallow Wyrm; Tamsin and Rook if they came.
- What happens: The river is mirror-flat and humming. Then it stands up: the Sallow Wyrm rises in an S-curve beside the drowned stairs, a serpent of clear water plated with mirror-glass, each plate holding a different patch of sky, with a blank mirror for a face. Its plates turn the protagonist's spells aside until Repel knocks it back and the plates gape; then Coil gets in. If companions came, they shout advice from the bank: Tamsin "Measure it first!", Rook "Hit it while it's open!". Neither can cast for them.
- Player does: fight the boss: Repel to stagger, Coil in the stagger window. Brace for the surges and Mend between phases, if learned. Losing is allowed: the companions (or the current) drag the protagonist up the bank, and they can try again or go back to Halfway first.
- Content to make:
Act1_Wyrm_Rise(the rise,<<start_battle sallow_wyrm>>, win and loss branches). Encountersallow_wyrm(enemysallow_wyrm: the bestiary's plated shield and three phases, section 8). Setswyrm.seen1 before the battle; on a winwyrm.defeated1 andact1.stage6. The plate itself is given once, in scene 5.4. - Art and audio: the Sallow Wyrm model (concepts
sallow-wyrm-a/b,sallow-wyrm-ref-a/b,sallow-wyrm-ref-side-a; the water body needs a translucent shader with the plates as opaque mirror meshes); a Drowned Steps battle arena (conceptarena-drowned-steps-a); VFX for the plates turning a spell aside and gaping open on a stagger; boss music, ideally built on the choir hum. - Screens used: Dialogue box, Battle HUD (with the Wyrm's plates shown open or closed: question 4), Battle result.
Scene 5.4: Still water
- Where:
drowned_steps, the landing, right after the win. - When:
wyrm.defeated != 0, the end ofAct1_Wyrm_Rise. - Who: Tamsin and Rook if they came.
- What happens: The Wyrm comes apart into a thousand glints that dissolve like breath off a mirror, and the plates sink. The river goes still and stays still, and for a moment new glyph cuts flash on the steps far below the water, too deep to reach (a hook). One plate washes up, still showing a sky that isn't this one. Tamsin calls the protagonist's Coil "a Tender's spell in Warden hands"; Rook says they drew it like it owed them money. Each, separately, asks the protagonist to come with them.
- Player does: talk; pick up the wyrm plate.
- Content to make:
Act1_Wyrm_After(lines vary by companion flags andring.tamsin.won). Itemwyrm_plate(key item, given once, here). Setssteps.deep_glyphs1 (hook). - Art and audio: glint-burst dissolve VFX; deep glyph flash under the water; the choir hum resolving to silence; the wyrm plate prop (a single mirror plate).
- Screens used: Dialogue box, Choices, Satchel (item received).
Chapter 6: The road onward
Scene 6.1: Back to Halfway
- Where:
halfway, the Truce Stone; the Reeve atMark_reeve. - When:
act1.stage == 6, as anenterentry on arriving. - Who: Reeve Hollin Tace, the Gate Pair, Dorrit, a crowd.
- What happens: The barges are moving again and Halfway knows who to thank. The Reeve pays a reward from the market fund, then tells the protagonist plainly that half the town now wants them in Twinhold and the other half in Lanternfall, and the truce only covers the town. Dorrit gives them free passage on her barge for life. The Halfway NPCs switch to their after-the-Wyrm lines.
- Player does: talk; receive the reward.
- Content to make:
Act1_Halfway_Reeve_After. Setsact1.stage7;rep.evane+5 andrep.facets+5 (both sides saw it). Reward: 60 copper (section 4). - Art and audio: the crowd at the stone; a brighter variant of the Halfway music.
- Screens used: Dialogue box, Satchel.
Scene 6.2: Cut and set (optional)
- Where:
halfway, Quill's stall (Amber Row), then Harl's (Pale Row). - When:
all[wyrm.defeated != 0, still_water.stage < 2], before or after the road choice. - Who: Quill, Harl.
- What happens: Quill can cut the wyrm plate but won't set it in silver; Harl can set it but won't cut mirror-glass. Carried between the two rows, the plate becomes a Still-Water Locket, a silver locket holding a disc of water that has never rippled, which helps its wearer hold their breath. Each craftsman pretends not to know the other's work is in it.
- Player does: talk, walk between the rows, pay.
- Content to make: quest
still_water; nodesAct1_Quill_Plate,Act1_Harl_Plate. Quill cuts thewyrm_platefor 20 copper (still_water.stage1); Harl sets it into astill_water_locket(charm: breath +8%) for 25 copper, and the plate goes into the locket (still_water.stage2). The first gear that changes casting (main tab, section 9). - Art and audio: the Still-Water Locket (concept
items/still-water-amulet-ref-a); a gear icon. - Screens used: Dialogue box, Shop (pay), Satchel, gear slot (Idea).
Scene 6.3: Home, briefly (optional)
- Where:
sallowbank, the ferry landing (Mark_aske_ferry), and the square. - When:
act1.stage >= 1. Aske is back at the ferry from Act 1 on (a new actor entry,when act1.stage >= 1). Theaske_bracequest shows in the log from stage 2, once the player has reached Halfway. - Who: Aske; Tobin, Marra, Fenn.
- What happens: Aske isn't surprised to see the protagonist and doesn't say she's glad. If the Wyrm is gone she's heard ("Coil. Huh."); if not, she says the Steps are theirs to deal with, not hers. Either way she teaches Brace, hand over hand: she traces it with them but won't cast, her thumbs over theirs and the bands turned to the skin. In the square, the villagers have Act 1 lines, and Fenn shows off a chalk door-mark that gave one spark, once.
- Player does: talk; learn Brace by tracing.
- Content to make: quest
aske_brace; nodesAct1_Ferry_Aske(ends in<<learn_spell brace>>), and_Act1parts forPrologue_Villager_Tobin,_Marra,_Fenn(their entry nodes invillagers.yarngain a branch foract1.stage >= 1). Setsspell.learned.brace1,aske.brace1,fenn.spark1. Spell Set: Brace is "taught by Aske hand over hand" in Act 1; this is that lesson. - Art and audio: Brace VFX (a pale blue bracket of light; not made yet); Fenn's single spark on the chalk mark.
- Screens used: Tap prompt ("Talk"), Dialogue box, Trace lesson.
Scene 6.4: Two gates
- Where:
halfway, the gate square between the Pale Gate (the Twinhold road) and the Amber Gate (the Lanternfall road). Tamsin atMark_tamsin_gate, Rook atMark_rook_gate. - When:
act1.stage == 7. Both gates' exits open only from stage 7 (an exitwhen, question 9). Actorswhen act1.stage == 7. - Who: Tamsin, Rook.
- What happens: Tamsin waits at the Pale Gate with her satchel of sealed orders; Rook sits on the Amber Gate's mile-post. Neither tries to stop the protagonist going the other way, which is the most either has conceded. The protagonist chooses which letter to deliver first. Whoever's city it is walks with them; the other says they'll be found later. Aske's words come back as narration: "Believe neither until you've met both."
- Player does: talk to either; choose a road.
- Content to make:
Act1_Gates_Tamsin,Act1_Gates_Rook, both ending inAct1_Gates_Choose. Setsact2.first1 (Twinhold) or 2 (Lanternfall),companion.tamsin/companion.rookfor the chosen road,act1.stage8 andact1.done1. Questsallow_roadcompletes. ExitsExit_to_pale_roadandExit_to_amber_roadlead into Act 2. - Art and audio: two gates: a symmetrical pale stone arch and a mismatched glass-and-timber arch; the road-choice moment wants a musical sting.
- Screens used: Tap prompt ("Talk"), Dialogue box, Choices, Exit sign.
Concept art
From Walkthrough: Prologue and Act 1 › Act 1: The Sallow Road